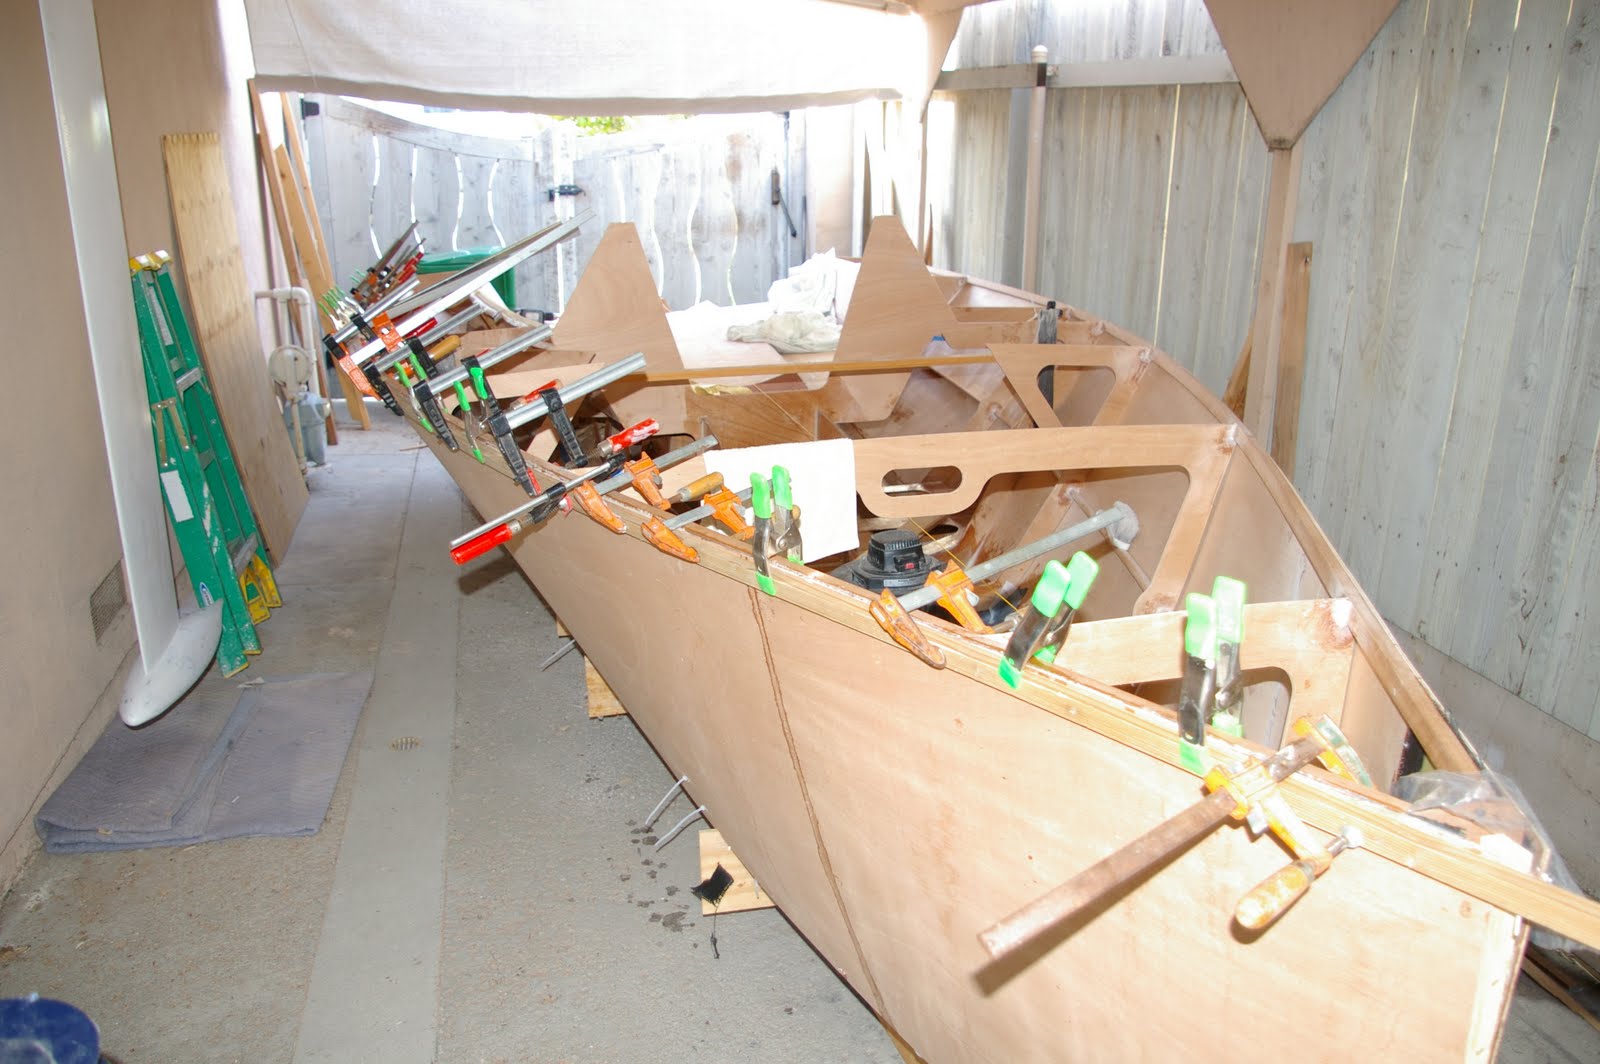
There are lots of ways to do the sheer on the boat. Here are some pictures of what I did on Critical Twist. I used 1"x2" clear spruce for the outside of the clamp.
Then added another 1"x1" spruce strip on the inside of the clamp.
Sheers and Clamps
10 posts
• Page 1 of 1
Sheers and Clamps
![]() by jray » Wed Jul 11, 2012 3:35 am
by jray » Wed Jul 11, 2012 3:35 am
You do not have the required permissions to view the files attached to this post.
Jon
#061 Critical Twist
#061 Critical Twist
- jray
- Posts: 531
- Joined: Fri Mar 25, 2011 6:26 pm
- Location: Polson, Montana
Re: Sheers and Clamps
![]() by jray » Wed Jul 11, 2012 3:47 am
by jray » Wed Jul 11, 2012 3:47 am
Then shaped with a hand plane and sanded with a two foot long board 80 grit to get the radius that looked right. I went as far as the ply would let me with out going all the way into the clamps.
A layer of Dynel and six oz glass cover the clamp, faired and the deck glass over the top of that.
A layer of Dynel and six oz glass cover the clamp, faired and the deck glass over the top of that.
You do not have the required permissions to view the files attached to this post.
Jon
#061 Critical Twist
#061 Critical Twist
- jray
- Posts: 531
- Joined: Fri Mar 25, 2011 6:26 pm
- Location: Polson, Montana
Re: Sheers and Clamps
![]() by jray » Wed Jul 11, 2012 3:52 am
by jray » Wed Jul 11, 2012 3:52 am
Finally some epoxy primer before flipping and starting the chore of fairing and glassing the bottom. As I stated there are lots of ways to do this. Hopefully someone else can help out with another method that they used.
You do not have the required permissions to view the files attached to this post.
Jon
#061 Critical Twist
#061 Critical Twist
- jray
- Posts: 531
- Joined: Fri Mar 25, 2011 6:26 pm
- Location: Polson, Montana
Re: Sheers and Clamps
![]() by lohwaikin » Wed Jul 11, 2012 7:28 am
by lohwaikin » Wed Jul 11, 2012 7:28 am
Jon,
What about the inside of the sheer? Do you do anything to it, like epoxy filleting or glass-taping?
Looks like I'm a tat late on the sheer part.
I have all the frames filleted and glass-taped right up to the hull edge.
Cutting notches through the frames will be an epic...
What about the inside of the sheer? Do you do anything to it, like epoxy filleting or glass-taping?
Looks like I'm a tat late on the sheer part.
I have all the frames filleted and glass-taped right up to the hull edge.
Cutting notches through the frames will be an epic...
Loh Wai Kin
Hull #437 "Big Bad Wolf"
Singapore.
Hull #437 "Big Bad Wolf"
Singapore.
- lohwaikin
- Posts: 137
- Joined: Thu May 10, 2012 3:33 am
Re: Sheers and Clamps
![]() by jray » Wed Jul 11, 2012 12:03 pm
by jray » Wed Jul 11, 2012 12:03 pm
Sorry no pictures of the inside during construction. Every thing was filleted and taped after the deck went on. Though it might be a tough job to make notches and install a clamp in my view it would be worth the effort. I ended up doing that when I added the 1"x 1" inside piece to the clamp. It was an afterthought to get a little more surface to attach the deck to.
Jon
#061 Critical Twist
#061 Critical Twist
- jray
- Posts: 531
- Joined: Fri Mar 25, 2011 6:26 pm
- Location: Polson, Montana
Re: Sheers and Clamps
![]() by Kevin » Wed Jul 11, 2012 3:37 pm
by Kevin » Wed Jul 11, 2012 3:37 pm
Jeff ripped a 1x2 on an angle corner to corner. That gave him a nice internal angle to fillet and tape to. If you wanted a wider strip for the deck then use a 2x2 instead. Rip the stock first, then scarf them together into one long piece. Notch the frames to fit. Epoxy them to the hull panels (this takes lots of clamps because you need one every 8-12 inches as the clamp board is going to be twisted to fit the hull shape. The 2 fight each other and the result is a fair curve. Fit the clamp so the top edge is just proud (slightly above) of the side panel edge. Once it cures, shape the clamp to match the deck angle along the sheer. Oh, and you can do one side then the other.
Notching the frame for the clamp shouldn't be too bad with the right tool. One of those small vibrating saws where the blade doesn't spin but moves side to side a very small distance would work well (dremel makes one now that's a knock off of another much more expensive tool).
You can top the rest of your frames the same way to make short work of gluing down decking. If you tape the strip to the frame and use micro fiber in your glue to hold down the deck, I don't think you need to tape the deck seam. I didn't do that personally and have a very solid hull.
Kevin.
p.s. This is so much better than what I did which was a total PITA which I will not detail for anyone because it was just a waste of time.
Kevin McDaniel
i550 #074 - PipeDream
i550 #074 - PipeDream
- Kevin
- Posts: 457
- Joined: Fri Mar 25, 2011 7:11 pm
- Location: Evanston, Il
Re: Sheers and Clamps
![]() by Chad » Wed Jul 11, 2012 6:23 pm
by Chad » Wed Jul 11, 2012 6:23 pm
Cutting the notches is not a big deal- I routed mine before applying the hull sides to the boat, but it would still be easy with a pull-saw, a drill bit, and a dremel or file to clean up. You will NOT get a fair shear with just the raw plywood edge.
I used 3/4" x 1 1/2" (19mm x 37mm) full length fir, with the bottom edge radiused, and used a full length batten as a caul on the outside of the hull panel when I clamped them up so that there wouldn't be a hard spot at each clamp.
Clamping:
It would be perfectly acceptable to use small screws every couple inches instead of clamps, and remove them after the glue sets. By now in your build, hopefully you've realized that fastener holes, zip tie holes, and lots of other abuse to the once-virgin ply panels just don't matter.
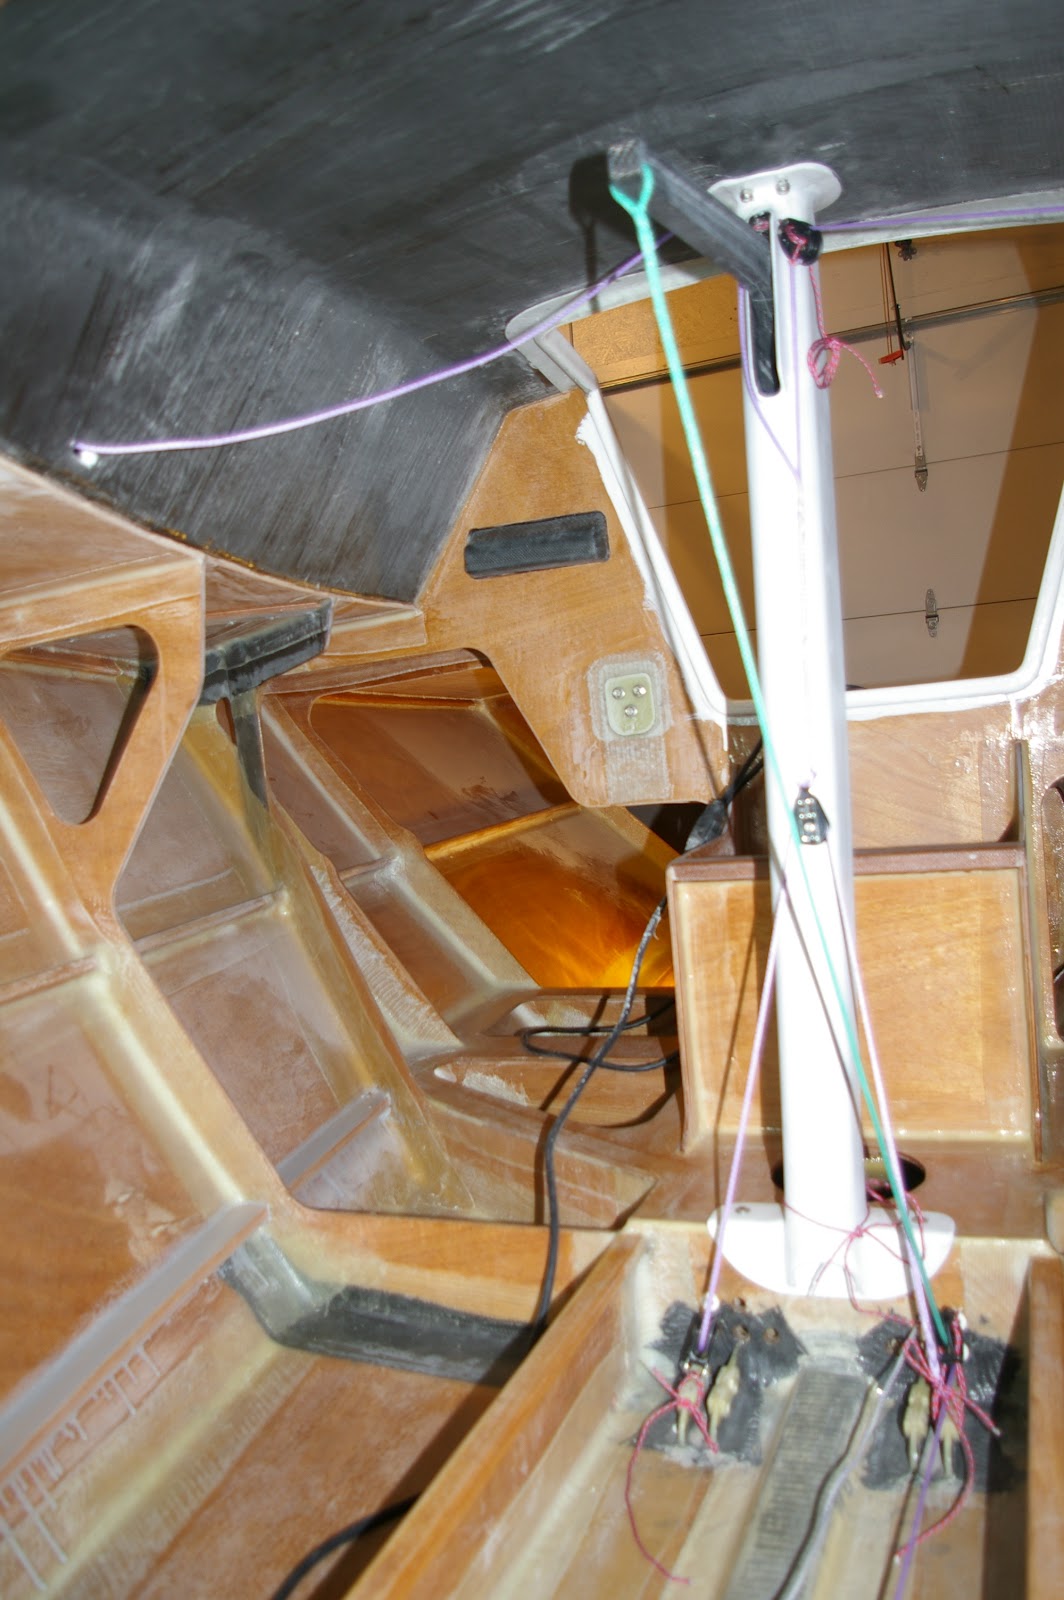
I didn't tape the inside corner of the shear- the shear clamp is there to provide a bunch of surface area, I used a fairly hard wood, and I used biax tape over the outside where the fibers are in tension and doing the most good. But maybe that's just rationalizing, because I did not want to tape that joint if it could possibly be avoided!
Here's how it looks from inside:
I used 3/4" x 1 1/2" (19mm x 37mm) full length fir, with the bottom edge radiused, and used a full length batten as a caul on the outside of the hull panel when I clamped them up so that there wouldn't be a hard spot at each clamp.
Clamping:
It would be perfectly acceptable to use small screws every couple inches instead of clamps, and remove them after the glue sets. By now in your build, hopefully you've realized that fastener holes, zip tie holes, and lots of other abuse to the once-virgin ply panels just don't matter.
I didn't tape the inside corner of the shear- the shear clamp is there to provide a bunch of surface area, I used a fairly hard wood, and I used biax tape over the outside where the fibers are in tension and doing the most good. But maybe that's just rationalizing, because I did not want to tape that joint if it could possibly be avoided!
Here's how it looks from inside:
- Chad
- Posts: 806
- Joined: Fri Mar 25, 2011 7:28 pm
- Location: N. E. MO
Re: Sheers and Clamps
![]() by Kevin » Wed Jul 11, 2012 7:06 pm
by Kevin » Wed Jul 11, 2012 7:06 pm
I personally used little screws to hold down the decking when I glued that down. That worked great.
If you use a piece on the outside of the hull like Chad did, I'd run some packing tape along there just in case the epoxy goes over the edge. That's one less thing the have to cuss at after the fact and the tape is a quick and easy release film.
Kevin.
If you use a piece on the outside of the hull like Chad did, I'd run some packing tape along there just in case the epoxy goes over the edge. That's one less thing the have to cuss at after the fact and the tape is a quick and easy release film.
Kevin.
Kevin McDaniel
i550 #074 - PipeDream
i550 #074 - PipeDream
- Kevin
- Posts: 457
- Joined: Fri Mar 25, 2011 7:11 pm
- Location: Evanston, Il
Re: Sheers and Clamps
![]() by Chad » Wed Jul 11, 2012 7:09 pm
by Chad » Wed Jul 11, 2012 7:09 pm
Kevin wrote:I personally used little screws to hold down the decking when I glued that down. That worked great.
If you use a piece on the outside of the hull like Chad did, I'd run some packing tape along there just in case the epoxy goes over the edge. That's one less thing the have to cuss at after the fact and the tape is a quick and easy release film.
Kevin.
I used screws to clamp the deck too.
Didn't use a release on the caul, but was neat/lucky enough not to need it!
- Chad
- Posts: 806
- Joined: Fri Mar 25, 2011 7:28 pm
- Location: N. E. MO
Re: Sheers and Clamps
![]() by ryderp » Wed Jul 11, 2012 9:03 pm
by ryderp » Wed Jul 11, 2012 9:03 pm
I scarfed together two 10' 1x2" cedar boards and then cut it diagonally on my table saw to get both sheers. The advantage of the triangular shape (besides saving a bit of weight is that it is very easy to make triangular cuts in your frames using a multi-tool with a flush-cut blade (that vibrating saw mentioned above). I find the multi-tool to be incredibly valuable in this project for everything from trimming hardened glass/fiber to cleaning globs of epoxy off of surfaces, but I digress. I agree with Chad, I think that having a continuous sheer clamp going from bow to stern really helps to form a nice continuous curve in the plywood. Once I had the sheer support on, I just used a Stanley Surform plane to make the top even.
Phil
P.S. it really helps to have a couple of helpers when you rip a 20' piece of lumber, even if it is pretty light.
Phil
P.S. it really helps to have a couple of helpers when you rip a 20' piece of lumber, even if it is pretty light.
- ryderp
- Posts: 259
- Joined: Thu Apr 28, 2011 3:54 pm
10 posts
• Page 1 of 1
Who is online
Users browsing this forum: No registered users and 15 guests